This article covers the legal framework behind evacuation drills, step-by-step procedures for conducting effective drills, how protocols vary by emergency type, common implementation challenges, and best practices that ensure student safety and regulatory compliance.
Key Takeaways
- Evacuate when fire, collision, submersion, or similar threats make staying onboard more dangerous
- State drill rules differ: New York requires three annually; Pennsylvania and Oklahoma require two
- Practice calm exits via front doors, rear doors, roof hatches, or windows; assemble 100+ feet away
- Coordinate directors, admins, drivers, and students—and plan accommodations for students with disabilities
What Are School Bus Evacuation Procedures?
School bus evacuation procedures are standardized, step-by-step protocols that guide drivers and students in safely exiting a school bus when remaining onboard poses greater risk than evacuating. The goal is to move every passenger to a safe location as quickly as possible while limiting panic and injury.
Drills vs. Real Emergencies
Evacuation drills are controlled practice exercises run in safe environments on school property. Actual emergency evacuations are real-time responses to life-threatening situations. Drills prepare students and staff for the rare moments when a real evacuation is required.
How Evacuation Differs from Routine Procedures
Evacuation procedures are not the same as routine loading and unloading protocols. Loading and unloading happen during normal operations at designated stops. Evacuations occur only when an emergency makes it unsafe to remain on the bus, requiring immediate action under stressful conditions.
Core Principles Across Jurisdictions
While procedures vary slightly by state and district, all share these core principles:
- Driver leadership - The driver directs the evacuation, remains calm, and supervises the exit sequence
- Orderly exit sequences - Students evacuate by rows or sections to prevent bottlenecks and congestion
- Designated assembly points - Everyone moves to a pre-identified safe location away from the bus
- Student accountability - Drivers and staff conduct headcounts to ensure no one is left behind or unaccounted for
Districts adapt these fundamentals to local regulations and to the specific emergency they face.
Why School Bus Evacuation Drills Are Legally Required
Most state education codes mandate evacuation drills to keep students prepared and lower injury rates in real emergencies. The legal basis comes from federal guidance plus state law.
NHTSA Highway Safety Program Guideline No. 17 recommends supervised, timed evacuation drills at least once each semester, plus emergency-exit instruction before every field trip or activity departure. That is guidance to states, not a direct nationwide mandate—enforcement sits with state and local law.
What Goes Wrong Without Regular Drills
When students and drivers skip evacuation practice, real emergencies often look like this:
- Students freeze in place, unsure of what to do or where to go
- Exits become blocked by students crowding in panic
- Students don't know how to operate emergency doors, roof hatches, or window releases
- No one knows where the safe assembly location is or how far away to move
- Drivers struggle to maintain order without a practiced routine
Evidence from Real Incidents
After the Gray Summit, Missouri, school bus crash, investigators found that none of the occupants recalled a pretrip evacuation briefing for the activity trip. NTSB concluded that missing briefings can slow evacuation and raise safety risk, and recommended instruction on the location and operation of every exit.
Challenges with Emergency Equipment
A 2018 study of kindergarten through second-grade students found that 42% of kindergarteners could not apply the roof hatch's maximum permitted opening force, only 20% opened it successfully, and 89% of children who finished both physical and cognitive tests could not operate the hatch. Hands-on drills give students repeated, supervised practice with that equipment before an emergency.
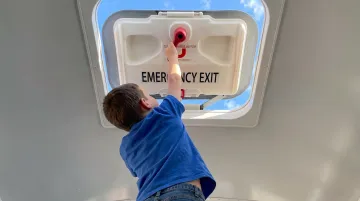
Regular drills cut hesitation, build muscle memory, and make exit routes and hardware familiar—so students and drivers move faster when every second matters.
How to Conduct a School Bus Evacuation Drill (Step-by-Step)
Evacuation drills should occur on school grounds, involve all students who ride the bus, be supervised by school personnel beyond the driver, and typically happen at least twice per school year. Below is a complete walkthrough of the drill process from planning to post-drill review.
Pre-Drill Planning
Transportation directors and school administrators should lock in logistics before drill day:
- Coordinate schedules early and share dates with drivers, teachers, and parents
- Designate supervisory staff beyond the bus driver
- Choose a safe site (school parking lot or bus loop) away from active traffic and other hazards
- Confirm the location can hold the assembly area and support realistic practice without real danger
During the Drill: Driver Actions
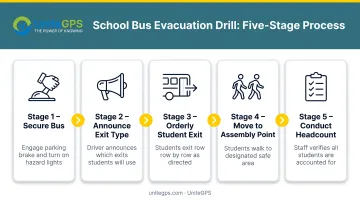
- Stop and secure the bus - Pull into the designated drill location, engage the parking brake, turn off the ignition, and remove the key
- Activate hazard lights - Make the bus visible to any onlookers or staff
- Announce the drill type - Clearly state whether students will exit through the front door, rear emergency door, or both (combination drill)
- Give verbal commands - Remain calm and use a clear, steady voice to direct students
- Supervise from inside - The driver typically stays on the bus during the drill to observe the exit sequence and ensure orderly flow
During the Drill: Student Actions
- Leave belongings behind - Backpacks, lunch boxes, and other items stay on the bus to prevent tripping hazards and delays
- Exit in an orderly manner - Many districts use an alternating-row system (one row from the left, one from the right) to prevent bottlenecks
- Move quickly but do not run - Speed is important, but running increases the risk of falls and injuries
- Assist younger or mobility-impaired students - Older students or designated helpers should provide support as trained
- Assemble at the safe location - Move at least 100 feet from the bus (as recommended by NHTSA) and remain there until the driver or school staff conducts a headcount
Post-Drill Actions
After all students have evacuated and assembled, drivers and school staff should debrief with students on the spot:
- Correct procedural errors - If students blocked an exit or forgot to assist a classmate, address it immediately
- Answer questions - Clarify any confusion and reinforce the steps
- Reinforce calm behavior - Emphasize that staying calm in a real emergency is just as important as moving quickly
Documentation Requirements
Drivers or administrators must complete a drill report for state compliance records. Documentation typically includes:
- Date and time of the drill
- Bus number
- Number of students participating
- Total evacuation time
- Any issues encountered (blocked exits, confusion, equipment failures)
- Corrective actions taken
Maintain these records per state retention rules. Many states require at least one year of documentation; some require longer.
Legal and Regulatory Requirements for Evacuation Drills
State education codes set the frequency, timing, documentation, and reporting rules for school bus evacuation drills. There is no single nationwide standard. Requirements vary significantly by jurisdiction.
State-by-State Frequency Examples
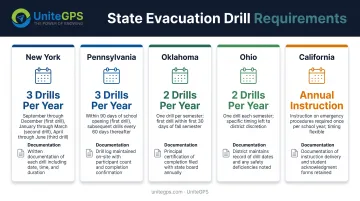
| State | Drills Required | Timing Windows | Documentation |
|---|---|---|---|
| New York | 3 per year | Within first 7 school days; Nov. 1-Dec. 31; Mar. 1-Apr. 30 | Annual state certification required |
| Pennsylvania | 2 per year | First week of term and during March | Bus-drill report due April 10 |
| Oklahoma | At least 2 per year | Preferably first two weeks of each semester | Retain forms locally for one year; not submitted to state |
| Ohio | 3 per year | All through front; all through rear; combination | Another staff member supervises; collect essential data |
| California | Annual instruction | For pre-K through grade 8 home-to-school riders; predeparture instruction for activity trips | Keep specified instruction records for one year |
Where State Rules Differ Most
- Timing windows: New York sets exact date ranges for each of three drills; Pennsylvania ties drills to the school calendar (first week and March); Oklahoma and Ohio do not prescribe specific months
- Supervision: Ohio requires at least one supervising staff member beyond the driver
- Special needs: Some states include modified procedures for preschool and special-needs students
- Record retention: Oklahoma keeps forms locally; Pennsylvania submits reports by April 10; New York requires annual state compliance certification
Do not assume a "typical two drills per year" rule applies everywhere. Check your state's education code, agency rules, and district policy before you lock a drill schedule. Frequency, timing, who must participate, drill formats, and reporting duties are not interchangeable across states.
Evacuation Procedures by Emergency Type
Evacuation procedures must adapt to the nature and urgency of each threat. The protocols below cover the most common school bus emergency scenarios.
Fire or Smoke on the Bus
Immediate actions:
- Stop the bus as soon as it is safe to do so
- Evacuate through exits farthest from the fire source
- Use a fire extinguisher only if the fire is small, contained, and does not block the exit path
- Move students quickly to the safe assembly point, staying upwind of smoke
Fire is a clear evacuation trigger. Priority is speed and distance: get students off the bus and away before smoke or flames raise the risk.
Bus Collision or Risk of Secondary Collision
A collision does not automatically require evacuation. The critical question is whether students are safer on the bus or off the bus.
Evacuate when:
- The bus is stopped on railroad tracks with a train approaching
- The bus is disabled on a highway with poor visibility or high-speed traffic
- The bus's position creates imminent risk of being struck by another vehicle
- The collision caused fire, fuel leaks, or structural instability
Consider staying onboard when:
- The bus is safely off the roadway and no secondary hazards exist
- Moving students outside would expose them to traffic or other dangers
- Emergency responders are en route and conditions are stable
If evacuation is necessary, move students far from traffic flow and establish a safe perimeter until first responders arrive.
Bus Submersion in Water
Driver actions:
North Dakota's school bus driver guide requires evacuation when a stopped bus could slide into water or is unstable. The driver should:
- Open roof hatches and the rear emergency door first
- Instruct students to exit through upper openings to avoid being trapped below the waterline
- Direct students to swim or wade to shore only if the distance is short and it is safe to do so
- If the distance is long or conditions are unsafe, students should remain on the roof of the bus until rescue
Critical note: Detailed protocols for buses already submerged vary by jurisdiction and are not uniformly codified in federal guidance. Districts should develop specific water-emergency procedures in consultation with local emergency responders.
Bus Rollover or Tip-Over
Exit selection depends on vehicle orientation and which exits are operable. Omaha Public Schools directs the use of roof hatches and the side door when the bus is on its side.
Key priorities:
- Help students exit through the "up" side of the bus first to prevent falls
- Avoid broken glass and sharp metal edges
- If the bus is stable, take time to assist mobility-impaired students safely
- If the bus is unstable or leaking fuel, evacuate immediately through the safest available opening
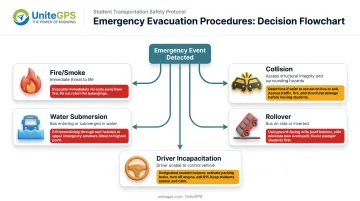
Medical Emergency (Driver Incapacitation)
When the driver cannot lead the evacuation because of injury or a medical event, older students or bus monitors must step in. NHTSA guidance recommends that riders be taught how to:
- Set the air brake
- Open the air door
- Use the two-way radio or cell phone to call for help
- Guide younger students to exit through the safest available route
Training for student helpers:
- Designate one or two older, responsible students on each route to serve as helpers
- Teach them the location of the parking brake, door controls, and communication equipment
- Practice the helper role during evacuation drills so it becomes second nature
Build this helper role into regular drills so a trained rider can secure the bus, call for help, and lead students out without waiting for the driver.
Common Challenges and Solutions in Conducting Evacuation Drills
Districts hit the same obstacles again and again when planning and running evacuation drills. Here is how to handle the most common ones.
Students with Mobility Impairments
NHTSA guidance calls for a written plan that identifies:
- Which students can self-evacuate
- Which can be moved without a wheelchair or child restraint
- Which must remain in equipment during evacuation
- Available helpers and necessary tools (belt cutters, lifts, blankets)
Students with Behavioral Disorders or Cognitive Differences
Colorado's transporting special-needs guide recommends:
- Explaining the drill plan beforehand and inviting student input
- Preparing students verbally over several days instead of springing the drill as a surprise
- Practicing in a safe, familiar location
- Using visual aids and simple, repeated instructions
Some students cannot fully join a drill because of sensory sensitivities or behavioral needs. Document the real-emergency method for those students and make sure the transportation team knows each individualized plan.

Language Barriers
There is no single federal bus-evacuation protocol for English learners. Minnesota's 2025 school-bus safety-training law still requires reasonable accommodations for English learners and students with disabilities.
Nevada's 2021 driver manual offers practical steps drivers can use:
- Learn each student's verbal and nonverbal communication
- Explain actions at the student's comprehension level
- Keep rules simple and consistent
Maintaining Student Attention Without Causing Fear
Drills need to be taken seriously without traumatizing students. Keep the tone steady with a few simple habits:
- Use age-appropriate messaging
- Explain that drills are practice so everyone knows what to do
- Give positive reinforcement when students follow procedures correctly
Extreme Weather and Limited Space
Weather and yard space often constrain when and how you run drills:
- Schedule drills in temperate weather when you can, to avoid extreme heat or cold
- If space is tight, stagger drills so only one or two buses evacuate at a time
- Confirm enough staff for supervision and enough room at the assembly area
Best Practices for Effective Evacuation Drills
Beyond meeting minimum legal requirements, the most effective drill programs incorporate these field-tested practices:
Vary Drill Scenarios
Conduct drills at different times of day and with different exit combinations:
- Front exit only
- Rear emergency door only
- Combination (front and rear simultaneously)
- Roof hatch practice (at least once per year with older students)
This variation ensures students are prepared for any situation, not just the one scenario they practiced most recently.
Involve Local Emergency Responders
Invite local fire departments or EMS to observe or participate in at least one drill per year. This provides:
- Real-world context for students
- Expert feedback on drill procedures
- Stronger community partnerships
- Familiarization with your bus fleet and school sites
Use Technology for Compliance Tracking
Districts with large fleets need clear records of which buses completed drills, when they ran, and what corrective actions followed. Keep drill logs tied to bus and route records so audits and state submissions are easier to produce.
Transportation platforms can strengthen that paperwork trail. UniteGPS Crosswalk K-12, for example, supports related documentation with:
- Digital vehicle inspections linked to specific buses
- Safety-compliance audit trails and historical reporting
- Exportable CSV or JSON records for state submissions
- Timestamped ridership and vehicle-history data for audits
Document and Analyze Every Drill
After each drill, collect quantitative and qualitative data:
- Total evacuation time
- Which exits were used
- Any procedural errors or bottlenecks
- Student and staff feedback
Use this data to refine procedures, adjust training, and identify which students or buses need additional practice.
Communicate with Parents in Advance
While not universally required by law, notifying parents before drills can reduce confusion and anxiety. Explain the purpose, timing, and what students will practice. Clear notice means fewer surprised calls and calmer drill days.
Conclusion
School bus evacuation procedures are a critical part of student transportation safety. They combine legal compliance with practical preparedness so districts stay ready for real emergencies.
Effective drills require collaboration among transportation staff, school administrators, drivers, and students, with ongoing training and documentation. Regular practice gives everyone the knowledge and confidence to respond calmly if an emergency occurs.
Districts that understand state-specific requirements, practice realistic scenarios, and refine procedures based on real feedback ensure every student knows exactly what to do when it matters most.
Frequently Asked Questions
What are the basic steps in school bus evacuation procedures?
The driver stops and secures the bus by engaging the parking brake, turning off the ignition, and activating hazard lights. Students evacuate through designated exits in an orderly manner, leaving belongings behind. All passengers assemble at a safe distance (at least 100 feet from the bus) for a headcount.
How do you perform a school bus evacuation drill?
Drills are conducted on school property with all riders present and supervised by school staff beyond the driver. Students practice exiting through front and rear doors while the transportation team times the evacuation and documents any procedural issues for state compliance records.
What is the 90-second evacuation rule for school buses?
The 90-second benchmark comes from FAA aircraft certification standards, not K-12 transportation law. A 2021 peer-reviewed study found no uniform U.S. school-bus evacuation time standard—the figure was only a hypothetical comparison, not a requirement.
How often are school bus evacuation drills required by law?
Frequency varies by state. New York requires three drills annually, Pennsylvania and Oklahoma require two, and Ohio requires three with specific exit combinations. Timing windows, documentation, and reporting obligations differ significantly by jurisdiction—always consult your state's current education code and local district policy.
What should students do if the bus driver is unable to lead an evacuation?
Trained student helpers or bus monitors should activate hazard lights, set the parking brake if needed, call for help by phone or radio, and guide younger students out the safest exit. Train older students for this role during regular drills so the bus is ready if the driver is incapacitated.
Where should students assemble after evacuating a school bus?
NHTSA guidance recommends at least 100 feet from the bus, with 300 feet described as best. The assembly point should be away from traffic, accessible to all students, and large enough to accommodate the entire group while the driver or staff conducts a headcount.